Monday, 21 July 2014

Edgings - Binding for Mitred Corners

Using single fold straight grain binding, 2" wide with a half-inch seam.  On a 6" square sample the binding looks clumsy but on a bigger piece of work it would be fine.

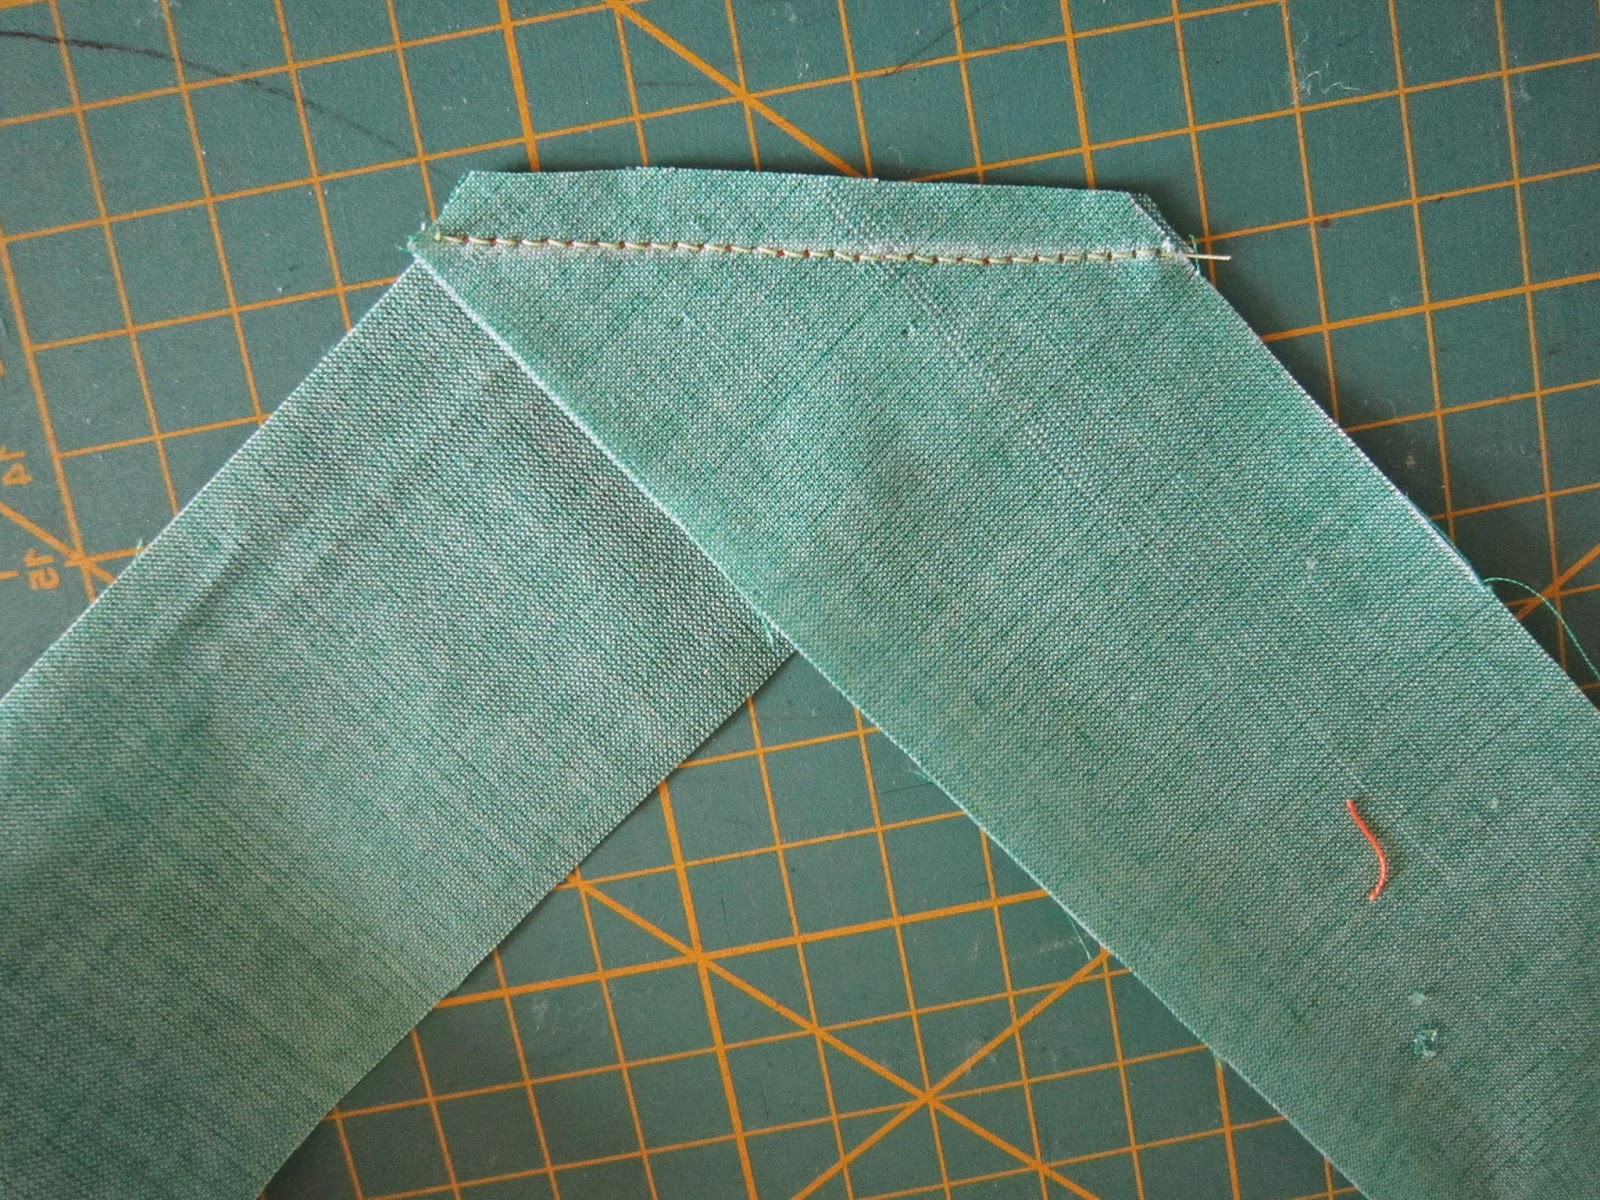
After calculating the length of binding needed it may be necessary to join some strips together. Place the two ends of the binding at right angles right sides together and draw a line across the intersection as shown.  Sew and trim and press the seam open.

Place the raw edges of the binding on your layers of fabric, wadding and backing leaving a good 4" at the beginning and starting from the middle of one side.

Use a half-inch seam and pin up to the first corner, but mark with a pin the half-inch stopping point before the corner.  Begin to sew the binding but stop sewing at this pin ready to create the first mitre.

Fold the binding up and back in line with the second side then fold the binding down again to create a neat fold with the fold on the edge of the first side just sewn.  Pin and sew from the fold right along the second side until half an inch away from the corner as before.

Repeat around side three and the beginning of side four.  Stop sewing about 6" away from the beginning of the binding.  (My 6" square did not give me this much room but normally you would be sewing a bigger piece of work).

Joining the binding: the beginning and end of the binding has to overlap by the same measurement as the width of the binding.  Mine is 2" so it has to overlap by 2".  Lay it flat, measure, and trim off the excess.


Place the two edges at right angles, right sides together and mark the intersection.  Pin this seam and test to check that it will be the correct measurement to finish your binding lying neatly and flat.  Sew the seam, trim and press open.  Now finish pinning and sewing the binding around the work.


Once the binding is sewn all around push out the corners with your fingers and turn them to the back and the mitres will form.

 Finger press the mitres in place. Turn in the seam at the back shaping the corners into neat folds. Press 


Sunday, 20 July 2014

Sample One of Edgings

For my course work I have to produce a range of samples of different edgings.  So over the next couple of weeks I shall be putting them on the blog as I do them.


 As I progress I will put them here with some brief instructions.  Anyone wanting to go into this in more depth please ask me for more detail.

For all these samples I will use 6" squares of fabric and backing and a 6" square of wadding in between.  This photo also has the green single-fold binding strips showing. 

This first sample is of an edging with single-fold binding and overlapped corners.


Cut the binding strips 4 times wider than you want the finished edge to be ( I want 1/2" edges so I have cut them 2" wide).  My square is 6" so I have cut the first two strips for the sides 6 3/4" long (they will be trimmed to match the edges of the square after sewing).  I cut the remaining two strips 7" long as they have to extend over the square and the two side bindings. 

Half inch seams are used here for this type of binding as it is single fold.  The fabric and wadding will bulk out the half-inch edges as it folds over.

Fold the strips lengthways wrong sides together and press. This mark should line up with the edge after sewing.  With raw edges matching and right sides together pin and sew the first two sides. 

Press the seams open with the iron.  do be careful not to have the iron too hot or it may wrinkle and shrink or melt the wadding, particularly if your wadding is made of polyester.  Keep the iron away from any exposed wadding on the edges. 

Fold the strip over the edges and turn in a half-inch seam then hand sew to the back of the square.

Trim off the surplus fabric at the edges so they line up exactly with the edge of the square.

Next pin the two remaining strips to the other sides, raw edges together as before and sew with a half-inch seam.

Press the seams open as before.  Trim the excess fabric from the edges but leaving a good 1/4" or more to turn in matching the edges to the strips sewn before.  Iron the turning in place and pin as shown on this photo.

Now turn these strips over as before and neatly catch in place by hand the corner turnings.  Sew the turned under seams by hand as before.

Press all round the edges with iron on cotton setting and your finished edges should form neat squares on the corners of the sample.

The next sample will be similar to this but have mitred corners.

Saturday, 12 July 2014

Making an Irridescent Picture

Making a picture on velvet from shiny sparkly bits and pieces is fun.  You could add a border afterwards and turn it into wall art, or pin it to some foam board as I have done and plan how to improve on the next one, or just enjoy it for no other reason than that. 

To start off you need a design, some black velvet, some Bondaweb, some baking parchment and lots of pretty things like sequins, micro-glitter and other shiny stuff.

An iron and a pad to iron on is essential, and a space where clearing up afterwards will be easy.


Here are just a few photos to get started.

Draw the design on to the paper side of the Bondaweb.

Cut across the horizontal lines of the design on top of the velvet and pull slightly apart.

Choose some parts of the design where you will use hot spots glue dots instead of Bondaweb and cut the Bondaweb away in those areas.  See here at the base of Bredon Hill and to the left of the church.

When you have started to work on the picture by removing the strips one at a time and using foil to decorate the velvet, move on to use the Hot Spots before removing the Bondaweb which will surround them

Hot Spots are on the back of brown paper and are fused to the velvet with a hot iron using baking parchment around the other parts of the design. After allowing it to cool remove the brown paper and use foil and other decoration on the little glue dots just the same as with Bondaweb. 


The earlier blog below discussed using Bondaweb and foils.

Here you see the two spaces cut from the design now decorated with foils and sequins on top of the Hot Spots.

Another technique to try is using fusible film. this is a shiny material that fuses to itself and can be bonded to other surfaces.  I have used it here for the river at the base of the hill and it catches the light and changes colour.

I also used it to make a moon by fusing some foil in between two layers of the film then cutting out a circle.

Never forget to use the baking parchment.
Don't forget to allow the Bondaweb and the Hot Spots to cool before trying to remove the paper.


On the last picture you can see some silk strips which were backed with Bondaweb, cut into strips and bonded on top of everything else.


Wednesday, 9 July 2014

Playing With Velver

Bredon Crafters has come round very soon after Quilting Arts so today I have worked hard preparing the project for next week.  At least now I am certain about what has to go into the kits and I will be with Kay and Chrys on Tuesday putting them together.

I first experienced this technique at a workshop with Angie Hughes and ever since have been promising myself another go using my own drawing rather than Angie's


To illustrate this post I will be using my own design and I have printed off enough for everyone.  However if you want to draw a design of your own it should be A4 size and drawn in such a way that it can be sliced into about five sections horizontally in a similar way to mine which you can see here.

Here the design is shown drawn on the paper side of Bondaweb and already sliced into sections on top of the black velvet..  You will see that I have cut a little more paper away in a couple of places because I want to use 'Hot Spots' there instead of Bondaweb.


Hot Spots are little pimples of glue on brown paper, rather than the glue mesh we are familiar with in Bondaweb.

This illustration shows them in close-up.  Hot Spots give a different result when foil is used so it adds variety to the picture.

In this illustration you can just see the iron at the side.  I am using it to tack the Bondaweb in place as I lie the strips on the black velvet and before ironing them in place fully.  This is to help get the image lined up properly with even gaps between the strips which outline and create the picture.


 Once the picture is ironed on to the velvet you can start working on it starting from the top.  Just remove the top paper only and work on that before moving to remove any more Bondaweb.

Always use baking parchment when gluing and decorating.  Cover the ironing pad with parchment and use a piece in between the iron and your work.

If you can remember the foiling we did way back you will soon be producing the first part of the picture.  Here though we are using Bondaweb and using a hot iron rather than waiting for glue to dry before applying the foils.

Always use foils COLOUR SIDE UP.

One colour on top of another gives interesting results and using second-hand foil is better than a brand new piece as the gaps in it make the work more natural.  When it is a completely new piece of foil the iron has to be used artistically to avoid big flat areas of colour and to keep away from the straight edges of the foil

I have used something called fusible film for the river, the moon and the church.  It has a shiny surface and does fuse to Bondaweb as well.


More to follow on all this bur for now here are some images of the partly finished and fully finished picture.

To be continued .....


Wednesday, 2 July 2014

Making a Placemat

I've written up the worksheet for making placemats. 

This placemat can be made up in numerous ways because the design has a plain centre which can be interpreted in any way you want.  It could have a patchwork or embroidered centre, fancy or formal quilting, applique, a painted surface, a photo on fabric or a block printed centre section. 

It occurs to me that this placemat design could be useful many times over so if we're stuck for a gift any time (or for exhibition items!!) we'll know what we can make.

However the purpose for it at the moment is as a vehicle for some block printing fun.  The sample I have made is block printed.  Not only does it provide an opportunity to practice some block printing but it's also a good way to try out some quilting or free machine embroidery techniques.  As well as that the mitred corners and the flat piping edging are useful techniques to practice too.


Here you see the flat piping machine-tacked in place before the borders are added.

Borders are sewn on right sides together, first at both sides, then top and bottom but starting the second lot of seams exactly at the corner so the mitred corners can be folded over as shown below.


So when the borders have been added the corners are mitred in a different way than we have previously done. 

The method is straightforward enough - just fold the top border under itself to form a 45 degree angle, make a crease and then with right sides together just sew along this crease from the corner to the edge.
This is all in the worksheet in detail.

Then the insulated wadding goes on the back with the metallised side up.

Any kind of decoration can be added at this point so long as it attaches the top to the wadding.  I have used free machine embroidery in metallic gold thread on the yellow lacy block print and green embroidery thread on the swirly flower block print.

 After this the lining is added, give it a good press and your placemat is finished.

Tuesday, 1 July 2014

We had a good one

The whole weekend was a success for Bredon Crafters and Quilting Arts.  Lots of visitors to the exhibition and the event enticing us to plan and present our own exhibition early next year.  What a beautiful display in the church, many, many congratulations to all those who planned, organised, created and presented the wonderful floral illustrations of well known books.

Thank you everyone, and most of all Chrys, who contributed to the design and making of Brian the Bredon Bookworm and also those who put him up on the church gate and then helped take him down again.  Let's hope Bredon Toddlers Group enjoy having him and that Brian enjoys his new home.

We need to get started again now so that we have lots of exciting exhibits ready for next year.  So the first thing for Quilting Arts is to try out some Indian Wood Block Printing on fabric which can then be used in various ways.  The project on offer for this is to make table placemats with the decorated material.

The printed blocks will decorate the centre of the placemat. Cut a piece of fabric for this centre piece measuring 16" X 10".

Gather together the fabric, your choice of print block, your choice of paint, a flat palette of some sort (a plastic plate will be available), a foam pad (use a mouse-mat if it has some give in it), a piece of sponge, some wet wipes and some kitchen paper.

Most of this will be available at our meeting - (but bring your own fabric)

 Put a small amount of paint on the palette, take up the sponge and twirl one corner of it in the paint so the paint spreads about and is not too thick on the sponge.

Transfer some of this paint on to the block with little tapping movements until all the pattern is covered.

Put the foam pad under the fabric centrally so that you can start printing from the centre.

Put the block face down on the fabric and apply pressure with the flat of your hand for a few seconds. Keep repeating this process as many times as you want and adding to the design on your cloth. Move the fabric as you work so that the foam pad is always underneath the printing area.

You will find that even if there is no paint left on the palette there will be quite a lot left in the sponge and tapping on the top of the block will transfer it to the pattern.

When you are finished with the first colour of paint it is time to clean everything up.  Your hands, the wood block the palette and the sponge.

Take it all to the sink and using one of the scrubbing brushes under running tepid water scrub the block clean and rinse out the sponge and palette till all paint is gone.  Dry with kitchen paper, squeeze the sponge in kitchen paper to prepare it for your next colour.  Use wet wipes for your hands and also to wipe off any paint traces from the foam mat under the fabric.

Now you are ready to add more to this design or start again with another one.

Here are some other example prints using 2 and 3 colours and which are ready to have some machine embroidery embellishment.

The method and worksheet for making up into placemats will follow.